Haulout From Hell
A. A. Milne
Although we had planned then failed to meet a few prior planned departure dates, in early 2004 we were fairly certain that we would get out late spring or early summer. As the days flew by, we thought a realistic target date was June 10, 2004, so we planned accordingly. Not all projects would be done, but not all projects needed to be done. We focused on those ‘must-do’ items before leaving on our open-ended itinerary.
One must-do was a haul out to clean/resurface/repaint our bottom. We planned to remove all existing bottom paint (24 years worth?), apply barrier coat, and apply three coats of Petit SR bottom paint. We thought the job would take us about two weeks, so we scheduled our haul out for April 16. That would get us back in the water by the first of May, and we would have another 6 weeks to tie up loose ends before leaving.
The yard was not able to haul us as planned on April 16, and we were bumped until April 19. In retrospect, these few days were a blessing. Nita used those days to cover everything below decks in plastic to lessen the mess that is inherent to being in a boat yard. (Yes, we were staying aboard while in the yard.) Bud used the days to organize tools and supplies. We were hauled out on the morning of April 19.
With the boat out of the water, it appeared we had a rather straight-forward job ahead of us. Friends and neighbors stopped by and commented on how nice her bottom looked – just pocked bottom paint. The guys in the yard had similar comments. Even our surveyor said that the job should be “a piece of cake”.
We both try to be as environmentally conscious as we can – even while working with the vile substances used on and around boats. We were aware of an environmentally-friendly paint remover, and we planned to use it to remove our bottom paint. This remover is a gel that is smeared on then covered with paper for 24-36 hours while it softens the existing paint. In theory, one can then scrape off the paint with the gel, and it can all be tossed in the trash – no airborne contaminants. It is not cheap, but such is the cost of using earth-friendly products. The two of us applied the gel and paper to the entire bottom in one day, then the skies opened.
It poured rain for about 36 hours. Of course much of our gel was washed off, and some of our paper blew away. Most of our supplies were soaked, and some were ruined. The yard had a few inches of standing water, and it is frightening to think what substances were floating around in that standing swamp because we had to wade through it to get on and off our boat.
When the rain stopped, we started trying to remove our bottom paint. We first tried scraping with putty knives as recommended by the manufacturer. Nothing. We tried carbide scrapers, and Bud was able to remove some paint with great effort. Nita could not put enough force on the scraper to budge the paint. Then two or our neighbors came to the rescue.
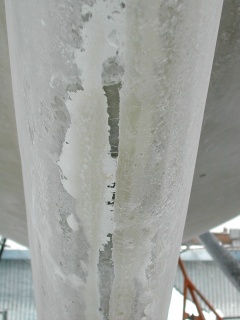
Space between halves
Kurt and Debbie had hauled their boat in October of 2002, and they were painting topsides among other lesser projects. We showed up one day to offer our help ‘just because’, and we ended up helping for two days. They really appreciated our help, so they came to repay us. Fortunately, Kurt was strong enough to remove some bottom paint with a carbide scraper, but neither Debbie nor Nita could. So Bud and Kurt scraped. We also hired our friend, Albert, to help scrape for a day.
As the paint came off, so did much of the underlying gelcoat. We knew that the gel remover was safe for gelcoat, so we did not know what we were experiencing. Over a few minutes to a few hours time, small amounts of water started to ooze from the areas where the gelcoat had been scraped. If our boat was blistered, wouldn’t we have seen them protruding outward?.
Debbie and Nita started grinding out the wet spots. As they ground in search of a dry edge, they would connect to another wet spot. Within a few hours we realized that we did not have isolated blisters. Rather, we had an entire layer of water between our mat and roving layers of fiberglass.
How did this happen? We can never be certain, but the collective knowledge of our reading and talking with countless others is that there must have been a cold joint when the boat was laid up. Something went wrong between the lay up of the outermost layers of mat and the inner mat/roving layers. The faulty joint created a potential space, for water to travel.
The outer layers of our boat were laid up in two half-molds. First the gelcoat was applied to the mold, and then several layers of mat were applied. The halves were then brought together, and the subsequent layers of mat/roving were applied as in a one-piece mold. The joint of the two halves had a space of ¼” to ½” where they should have been joined tightly but were not. This appeared to be at the level of the mat/roving interface.
So we surmised that we had a cold joint between the mat and roving layers of glass (a delay in laying up the roving?) which created a conduit for water. The result was a complete layer of water under the paint/gelcoat and 3/16” of fiberglass – or about ¼” below the surface.
The white covering the ground is fiberglass from one day’s grinding
We explored our options of what to do about this. They ranged from “nothing” to “remove and replace”. Those recommending that we do nothing argued that all 24 year-old boats are wet to some extent, and we have such a thick hull that the water won’t substantially degrade the hull for another 24 years. The moderates recommended that we remove the wet layers then barrier coat and paint. Again, because our hull is so thick, and mat provides so little strength, we would never miss the outer layers of mat if we removed them. Then the extremists on the other end of the spectrum recommended that we remove the mat, replace it, then barrier coat and paint. We have taken a lot of pride in the work we have done on Passage, and we knew almost from the onset that we would take the ‘ultimate’ route. We set out to remove and replace the outer layers of glass, and we would make some minor modifications and improvements as we went. Quite a commitment!
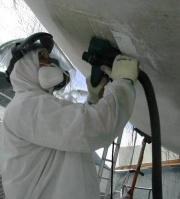
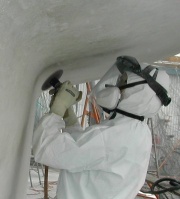
The first step was to get the remaining gelcoat off. Bud removed much of it with a power planer, but we had to hire someone with a specialized tool to plane the curve at the turn of the bilge. Bud could not get in there with a surface planer. Our hired help was able to roughly remove the gelcoat and some of the mat in the curves, but Nita had to grind away much of it with a small pneumatic grinder.
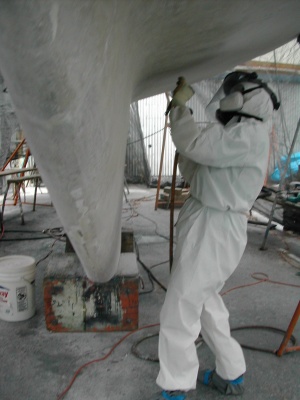
Then we had to remove the mat external to the layer of water. Again, Bud was able to remove most of it with the planer; however, it took weeks of work. It came off in layers, and most areas were planed at least four times. Meanwhile, Nita was grinding away smaller areas that still trapped water. We were also dealing with a few other problems that we had discovered. We were simultaneously working on our rudder, skeg, deadwood, and keel.
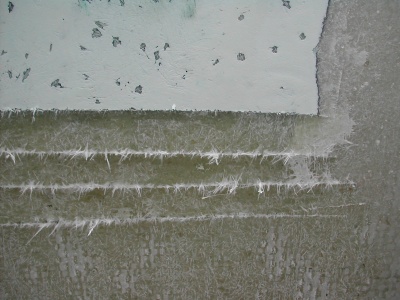
Layers become visible after planing four passes.Top layer is pocked gelcoat and next three layers are mat. Roving becomes visible at bottom of picture.
We knew that we needed to rebuild the rudder. We removed it early on, exposed all of the stainless steel structural elements, and had a machine shop replace the upper shaft. We then sent it off with our friend, Denis, whom returned it a month or two later ready for barrier coat.
We didn’t, however, know what a mess our skeg was. We discovered some extremely poor lay up there. There were voids where there was neither cloth nor resin – just holes. We had to open/explore them, and we filled them with cloth and epoxy.
We also had an outpouring of water from our deadwood. It appeared wet deeper than the level of the mat, so Bud drilled a few holes hoping it would drain over time. Instead, it drained a few gallons immediately. Water had found its way into an isolated area of stern tube, and it was working its way out through the fiberglass.
And our keel was also a problem – one that we may not have completely solved. The keel contained large amounts of water within the cavity itself. We drilled holes and kept fans and heat/lights on it, but it continued to seep a little water until we finally coated/painted it. We will possibly see a few blisters there again; however, we haven’t seen them yet one year later.
But back to the big job of removing/replacing our bottom… When it appeared that we had removed the faulty layers of mat and made repairs, we had a lot of fairing to do before laying up the final layers of new glass. Our planing and grinding had created a somewhat irregular surface, and we didn’t want to do all this work to end up with a bumpy bottom. We filled/sanded for days.
It was finally time to lay up the new glass. Having exposed and repaired areas on the skeg and keel, both areas were re-shaped and then laid up with two layers of bi-directional stitch cloth (Nytex) from several feet above the turn of the bilge to the bottom of the skeg and keel. Several layers of stitch cloth were also added along the entire external joint of the two hull halves. Nita worries about things that go bump in the night, so we even laid up a strip of Kevlar along our leading edge. Then, with invaluable help from our friends Denis and Ron, we laid up two layers of 10 ounce cloth over the entire hull below the waterline. Laying up the glass actually turned out to be a relatively simple part of the job. We hung the glass vertically as we went, securing the top edge of the dry glass to the hull with blue masking tape several inches above the wetted out area. We did a 50%+ overlap on the glass as we went from bow to stern, and we covered all surfaces with peel-ply cloth prior to squeegeeing out the bubbles.
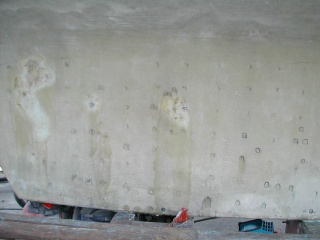
Keel draining
Bottom done – prepping bootstripe
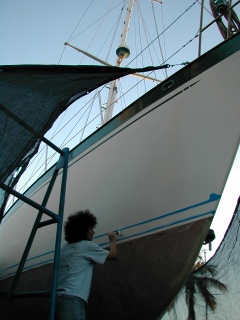
After the glass was done, we had more fairing to do. We filled and sanded and filled and sanded. Then we long-boarded until she was again fair. Finally, we put on two coats of plain West System epoxy resin, three coats of barrier coat, and three coats of bottom paint. We had raised our water line 2”, and we added a boot stripe. After 107 days, we launched her and took her back to her slip to start the clean-up process on the boat and the recovery process for us.
Bud had developed bilateral wrist pains that continued for months. He wore wrist braces and took lots of naprosyn. They resolved over a few months.
Nita had a grinder accident that removed part of a knuckle on her right index finger. She had it surgically repaired in December, and she again has full use of it.
Financially, we will recover over time. We saved all our receipts, but we have not added them up. We know we paid $70 per day just for the pleasure of being in the yard. It was an extremely expensive haul out.
If we had it to do over again, would we still do it? Yes. We have great confidence in our boat, and it is a comfort to know how strong and well-built her hull is. We have not scrimped on any other work we have done on her, and we did not want to scrimp on something as major as her hull.
Although this was a particularly difficult and large job, there were some positive aspects to it. Not only does Passage have a new lease on life, but we experienced friendships in ways we did not expect. Kurt would stop by just to help for a few hours (we usually sent him home). Debbie made and brought us food occasionally. We will never forget some chile she brought us – we were at a particularly low moment. Ron stopped by almost daily, and he often brought ice cream which helped Bud’s spirits tremendously. And Denis… We could not have done it without him. Other friends and neighbors stopped by just to provide a little support, and it was greatly appreciated – probably more than we were capable of expressing at the time.
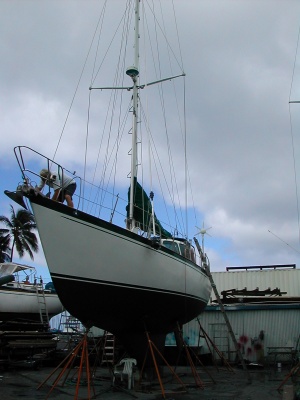
Ready to launch
‘Before’ and ‘After’ cleaning the port deck
But it was a lot of hard work, and as we write this, one simple sentence can encompass weeks of miserable work. Words alone do not reflect the magnitude of the job. We are hoping that our pictures are worth a thousand words in portraying what we did. And although this is now a year behind us, writing about it and reviewing our pictures from that time still evokes an emotional reaction. This was truly a haul out from hell.